springboot整合druid连接池
使用springboot默认的连接池
导入springboot data-jdbc依赖
<dependency> <groupId>org.springframework.boot</groupId> <artifactId>spring-boot-starter-data-jdbc</artifactId> </dependency>
配置文件配置连接池
spring: datasource: username: root password: 5201314 url: jdbc:mysql:///jqmb?serverTimezone=UTC driver-class-name: com.mysql.cj.jdbc.Driver
springboot默认的连接池
@Autowired DataSource dataSource; @Test void contextLoads() { System.out.println(dataSource.getClass()); System.out.println("____________________________________"); }

使用连接池druid
导入druid依赖
<dependency> <groupId>com.alibaba</groupId> <artifactId>druid</artifactId> <version>1.0.18</version> </dependency>
配置文件配置druid的属性
spring: datasource: username: root password: 5201314 url: jdbc:mysql:///jqmb?serverTimezone=UTC driver-class-name: com.mysql.cj.jdbc.Driver type: com.alibaba.druid.pool.DruidDataSource initialSize: 5 minIdle: 5 maxActive: 20 maxWait: 60000 timeBetweenEvictionRunsMillis: 60000 minEvictableIdleTimeMillis: 300000 validationQuery: SELECT 1 FROM DUAL testWhileIdle: true testOnBorrow: false testOnReturn: false poolPreparedStatements: true filters: stat,wall,log4j maxPoolPreparedStatementPerConnectionSize: 20 useGlobalDataSourceStat: true connectionProperties: druid.stat.mergeSql=true;druid.stat.slowSqlMillis=500

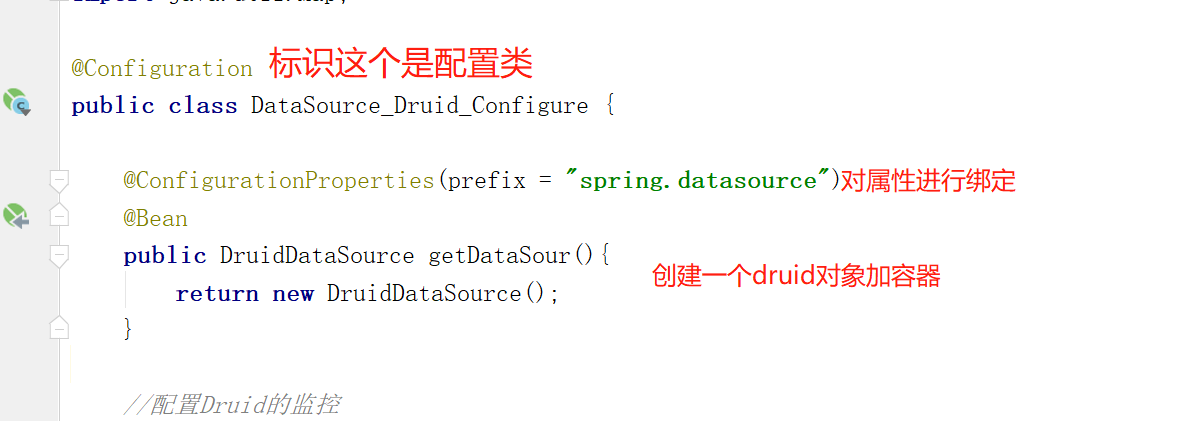
配置类中对druid属性进行绑定
@Configurationpublic class DataSource_Druid_Configure { @ConfigurationProperties(prefix = "spring.datasource") @Bean public DruidDataSource getDataSour(){ return new DruidDataSource(); }
配置Druid的监控后台
//配置Druid的监控 //1、配置一个管理后台的Servlet @Bean public ServletRegistrationBean statViewServlet(){ ServletRegistrationBean bean = new ServletRegistrationBean(new StatViewServlet(), "/druid/*"); Map<String,String> initParams = new HashMap<>(); initParams.put("loginUsername","admin");//登录用户名 initParams.put("loginPassword","123456");//登录密码 initParams.put("allow","");//默认就是允许所有访问 initParams.put("deny","192.168.15.21");//拒绝访问 bean.setInitParameters(initParams); return bean; } //2、配置一个web监控的filter @Bean public FilterRegistrationBean webStatFilter(){ FilterRegistrationBean bean = new FilterRegistrationBean(); bean.setFilter(new WebStatFilter()); Map<String,String> initParams = new HashMap<>(); initParams.put("exclusions","*.js,*.css,/druid/*"); bean.setInitParameters(initParams); bean.setUrlPatterns(Arrays.asList("/*")); return bean; }
访 src="https://img2020.cnblogs.com/blog/1931807/202011/1931807-20201127125737653-1942333069.png" alt="" width="1381" height="709" loading="lazy">
如果sql监控失效需要导入log4j 依赖
<dependency> <groupId>log4j</groupId> <artifactId>log4j</artifactId> <version>1.2.17</version> </dependency>
原文转载:http://www.shaoqun.com/a/493236.html
cicpa:https://www.ikjzd.com/w/1375
史泰博办公用品:https://www.ikjzd.com/w/2112
声网agora:https://www.ikjzd.com/w/2176
使用springboot默认的连接池导入springbootdata-jdbc依赖<dependency><groupId>org.springframework.boot</groupId><artifactId>spring-boot-starter-data-jdbc</artifactId></dependency>配
ola:ola
ishare:ishare
香慧寺收钱吗?寮步香慧寺要钱吗?:香慧寺收钱吗?寮步香慧寺要钱吗?
泰国:有多少水缸就多少老婆 - :泰国:有多少水缸就多少老婆 -
景德镇:看古瓷沧桑 - :景德镇:看古瓷沧桑 -
Comments
Post a Comment